Pegboard Inkle Loom - How to Guide
Pegboard seems flimsy but it can withstand the stresses because they are within the plain of the board. Just think about all the heavy tools people hang from pegboards in their garages. It has to be 2-sided to work but is strong where it needs to be.
If you're still not convinced, you can still have this style of loom made from hardwood. You will have to drill a lot of holes. The grid of holes is what makes this loom fantastic. It is more versatile than any other loom out there. This is because you can place the warping and tension pegs wherever you want. Almost any peg can become the tension peg, including multiple pegs so you'll never have problems with shrinkage again.
Materials:
One sheet of pegboard with 1/4 inch holes
Eight threaded rods, 1/4 inch diameter, 12 inches long
Fourteen washers and nuts that fit 1/4 inch rods
One pvc pipe, 3/4 inch diameter
Saw for cutting wood
Saw or pvc cutters for cutting plastic
Saw for cutting metal rods
The dimensions given in these instructions are for the exact loom shown. You can modify them to fit your own needs.
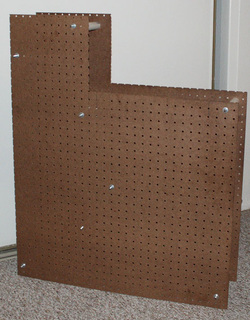
Cut two 30 inch long sections of pegboard measuring along the longer side. This can be done by the employees at some stores before you leave.
The 30 inch sides will be the top and bottom of the loom. The 36 inch sides will be the front and back.
Note:
Be sure to orient the two sides so that the holes line up when the edges of the boards are flush!
For each board saw down vertically 10 inches. Start at the top at a point 18 inches from the front.
Then saw horizontally for 18 inches from the front edge starting 10 inches from the top.
The two cuts should meet allowing you to remove the upper front corner of the board.
Saw or cut seven pvc segments 10 inches long. Cut one pvc segment 9 3/4 inches long.
If you're still not convinced, you can still have this style of loom made from hardwood. You will have to drill a lot of holes. The grid of holes is what makes this loom fantastic. It is more versatile than any other loom out there. This is because you can place the warping and tension pegs wherever you want. Almost any peg can become the tension peg, including multiple pegs so you'll never have problems with shrinkage again.
Materials:
One sheet of pegboard with 1/4 inch holes
Eight threaded rods, 1/4 inch diameter, 12 inches long
Fourteen washers and nuts that fit 1/4 inch rods
One pvc pipe, 3/4 inch diameter
Saw for cutting wood
Saw or pvc cutters for cutting plastic
Saw for cutting metal rods
The dimensions given in these instructions are for the exact loom shown. You can modify them to fit your own needs.
Cut two 30 inch long sections of pegboard measuring along the longer side. This can be done by the employees at some stores before you leave.
The 30 inch sides will be the top and bottom of the loom. The 36 inch sides will be the front and back.
Note:
Be sure to orient the two sides so that the holes line up when the edges of the boards are flush!
For each board saw down vertically 10 inches. Start at the top at a point 18 inches from the front.
Then saw horizontally for 18 inches from the front edge starting 10 inches from the top.
The two cuts should meet allowing you to remove the upper front corner of the board.
Saw or cut seven pvc segments 10 inches long. Cut one pvc segment 9 3/4 inches long.
Assembly
For the first couple pegs assembly might be a little awkward. Be sure not to bend the pegboard too much or it will tear. The pegs should always be as close to perpendicular to the board as possible. Finding something to lean one or both of the boards against may help.
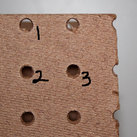
Begin by marking where you will place your permanent pegs. For most you will want them as close to the edge as possible to maximize your space. However, you should probably avoid putting them too close to an edge. Hole one pictured to the left would be too close to the top. Hole three is far enough in to be okay. Hole two is the safest but you lose some usable length.
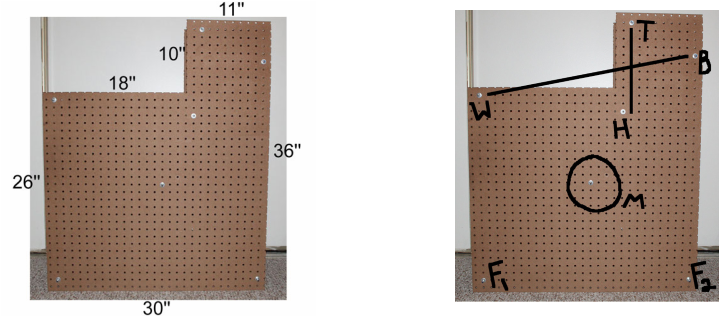
For my loom the foot pegs ( F1 and F2 ) are placed in the bottom corners.
The working space peg ( W ) is placed in the upper front corner. I left one hole free in front of this peg for tying on the warp when starting projects. A hole below the peg or anywhere else near it could be used instead.
The top peg ( T ) is placed 20 holes from the front edge.
The heddle peg ( H ) is placed 11 inches down and 1 inch forward of the top ( T ) peg.
The back peg ( B ) is placed 6 holes from the top edge.
The middle peg ( M ) is placed somewhere in the center of the loom. It's placement does not need to be exact. It simply adds stability to the pegboard.
To install pegs simply insert the threaded rod through a hole in one pegboard about one inch. Slip the pvc pipe over the rod on the side of the board that will be the inside of the loom. Continue pushing the rod through until an end comes out of the pvc. Push that end of the rod through the matching hole on the second pegboard side. Push the rod forward or back until it is roughly evenly sticking out of each side. Place a washer over each end. Place a nut on each end and tighten.
The rods will likely not slide smoothly through the holes the first time you use them . Either rotate the end of the rod in the hole in a swirling motion or use a 1/4 inch drill bit to widen the holes just a little.
You should be using the 10 inch segments of pvc. The shorter one is for the tensioning peg.
Begin by marking where you will place your permanent pegs. For most you will want them as close to the edge as possible to maximize your space. However, you should probably avoid putting them too close to an edge. Hole one pictured to the left would be too close to the top. Hole three is far enough in to be okay. Hole two is the safest but you lose some usable length.
For my loom the foot pegs ( F1 and F2 ) are placed in the bottom corners.
The working space peg ( W ) is placed in the upper front corner. I left one hole free in front of this peg for tying on the warp when starting projects. A hole below the peg or anywhere else near it could be used instead.
The top peg ( T ) is placed 20 holes from the front edge.
The heddle peg ( H ) is placed 11 inches down and 1 inch forward of the top ( T ) peg.
The back peg ( B ) is placed 6 holes from the top edge.
The middle peg ( M ) is placed somewhere in the center of the loom. It's placement does not need to be exact. It simply adds stability to the pegboard.
To install pegs simply insert the threaded rod through a hole in one pegboard about one inch. Slip the pvc pipe over the rod on the side of the board that will be the inside of the loom. Continue pushing the rod through until an end comes out of the pvc. Push that end of the rod through the matching hole on the second pegboard side. Push the rod forward or back until it is roughly evenly sticking out of each side. Place a washer over each end. Place a nut on each end and tighten.
The rods will likely not slide smoothly through the holes the first time you use them . Either rotate the end of the rod in the hole in a swirling motion or use a 1/4 inch drill bit to widen the holes just a little.
You should be using the 10 inch segments of pvc. The shorter one is for the tensioning peg.
Possible Problems
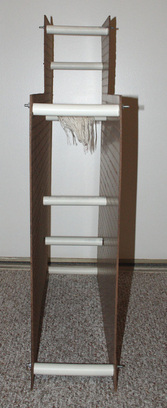
You can see in the picture to the right that if the pvc is not exactly equal lengths the sides will bow a little. This might actually help strengthen the loom similar to the slight bend in a kite. However, you do not want the board to bend too much or it will tear. What's shown here is fine. I have used this loom for years now with no problems.
The loom may wiggle if leaned against. It doesn't seem to be a structural problem though.
(2020 update: This loom has survived heavy use, several moves, and having things stored on top of it regularly. This loom might seem flimsy but is built to last!)
The skinny wood is uncomfortable to rest your wrists or arms on when working. I wear wrist braces when weaving which supply padding. Other options are pvc insulation or just throwing a folded towel over the edge.
Tensioning
Your first thought when you saw this loom might have been, 'Where's the tensioning peg?' The answer is, 'Anywhere you want it to be'
The true beauty of this loom is pretty much everything is adjustable. On my first inkle loom I used a tension bar that had a track for the peg to slide forward and back and was tightened in place with wingnuts. The peg would slip in it's track. At times I would find it very difficult to pull the peg back and tighten it down and the same time. It was awkward and sometimes painful to use.
There's another way to tension that uses a block, but I've heard that it has a tendency to slip. That's the one where a rectangular peg is rotated to push against the band. Well, the band pushes back so the block will not always stay in place. It also only allows for a couple inches of adjustment so not much tension can be added.
The way this tension device works is you place the tension peg in the board. As tension increases and you need to release it to advance the band or to be able to open the sheds, you remove the threaded rod while holding the pvc segment. Move the pvc segment to a new position. Replace the threaded rod through the pvc.
The reason this pvc segment should be shorter than the others is to allow you to more easily line up the rod with the hole in the second pegboard side. It can be done by feel but I found this annoying.
The tension peg does not need to have nuts or washers. It is not structural for the loom so it does not need to be secured in place. Leaving the nuts off allows it to be moved more quickly.
The tension peg can move vertically or horizontally. When deciding where to place the tension peg in your warping layout think about how long your band will be. The longer the band, the more the difference in length will be between your original warping and your finished piece.
If you miscalculate and cannot relieve tension anymore with the tension peg you can always move another peg.
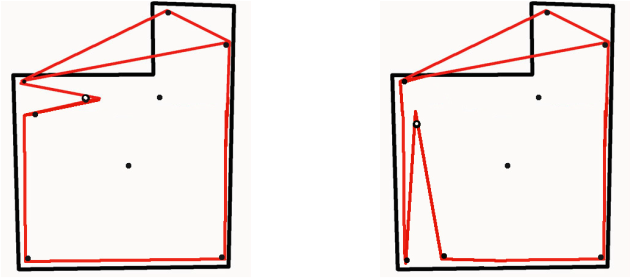
Here are two typical tension peg placements. The tension peg is shown as a dot with a white center.
The true beauty of this loom is pretty much everything is adjustable. On my first inkle loom I used a tension bar that had a track for the peg to slide forward and back and was tightened in place with wingnuts. The peg would slip in it's track. At times I would find it very difficult to pull the peg back and tighten it down and the same time. It was awkward and sometimes painful to use.
There's another way to tension that uses a block, but I've heard that it has a tendency to slip. That's the one where a rectangular peg is rotated to push against the band. Well, the band pushes back so the block will not always stay in place. It also only allows for a couple inches of adjustment so not much tension can be added.
The way this tension device works is you place the tension peg in the board. As tension increases and you need to release it to advance the band or to be able to open the sheds, you remove the threaded rod while holding the pvc segment. Move the pvc segment to a new position. Replace the threaded rod through the pvc.
The reason this pvc segment should be shorter than the others is to allow you to more easily line up the rod with the hole in the second pegboard side. It can be done by feel but I found this annoying.
The tension peg does not need to have nuts or washers. It is not structural for the loom so it does not need to be secured in place. Leaving the nuts off allows it to be moved more quickly.
The tension peg can move vertically or horizontally. When deciding where to place the tension peg in your warping layout think about how long your band will be. The longer the band, the more the difference in length will be between your original warping and your finished piece.
If you miscalculate and cannot relieve tension anymore with the tension peg you can always move another peg.
Here are two typical tension peg placements. The tension peg is shown as a dot with a white center.
Pegs and Padding
You can add a large number of pegs. Any added peg would not be structural so a non-threaded rod may be used though for some reason these seem to cost more.
These pegs can be shorter. My pegs are 7 inches long. This is because 1/4 inch threaded rod is cheaper when bought in 3 foot long sections rather than 1 foot. I bought two of them and cut them into 9 inch segments. Your pvc segments should always be about 2 inches shorter than the threaded rod segments to allow room for the pegboard, washer and nut. You can use a hacksaw or bolt cutters to cut the threaded rods. Be sure to sand down or cover the ends as these will be sharp! It is very easy to cut yourself accidentally when walking past the loom if these ends are left sharp.
These pegs can be shorter. My pegs are 7 inches long. This is because 1/4 inch threaded rod is cheaper when bought in 3 foot long sections rather than 1 foot. I bought two of them and cut them into 9 inch segments. Your pvc segments should always be about 2 inches shorter than the threaded rod segments to allow room for the pegboard, washer and nut. You can use a hacksaw or bolt cutters to cut the threaded rods. Be sure to sand down or cover the ends as these will be sharp! It is very easy to cut yourself accidentally when walking past the loom if these ends are left sharp.

Warping Layout
At least six pegs are needed to create a usable path.
The path must circumvent the heddle peg.
The path must never cross itself.
More turns in the path will make the piece more difficult to advance but if enough tension is removed this is not an issue.
You can use as much or as little of this loom as you want. A lady once told me her husbands garb took 9 yards of trim. You could weave that easily in one band on this loom.
The first two layouts shown above were done so that no two pegs were closer than 5 inches together. This gives plenty of room for passing a ball or skien of yarn through when warping.
Your tension peg should be planned to allow for shrinkage. It should also be in easy reach.

Please consider donating if you found this helpful.
